Wiring a reasonably priced 12V PSU

Wiring a reasonably priced 12V PSU

My latest and first ever PSU wiring attempt https://www.dropbox.com/sh/lyeppfismchfzvr/nhWlDJCit1 My limited multimeter skills indicate it may be safe. Based loosely on http://www.reprap.org/wiki/RepRapPro_Mendel_power_supply Does anyone know why AC ground has to be explicitly connected to V-? Why isn’t it wired from the factory?

These are reasonable sources of 12V, the main alternative to computer ATX power supplys.

Posted in Uncategorized | Tagged , , , | 1 Comment

Custom buttons in Pronterface

Pronterface is great free software available at https://github.com/kliment/Printrun

You can add custom buttons that do useful stuff that isn’t pre-installed. I want to share the buttons I find useful. These are tested in pronterface on ubuntu and windows 7 with RAMPS and Sprinter. Most if not all should work the same with Marlin and possibly other reprap firmware and controllers but I havn’t tested them, ymmv.

Adding custom buttons

Adding a custom button is easy. Either click the little “+” button or right click on the main window somewhere and “Add custom button”. The commands you can send are G-codes. The definitive list of available G-codes is in your firmware. http://www.reprap.org/wiki/G-code is a nice list for reference. At time of writing there is a list for Sprinter around line 180-250 here: https://github.com/kliment/Sprinter/blob/master/Sprinter/Sprinter.pde#L180

Fan control

Turning fans on and off is easy assuming you have them wired to D9 on RAMPS.

  • Button text: Fan on
  • Command:M106
  • Button text:Fan off
  • Command:M107
  • Button text:Fan 50%
  • Command:M106 S127

The S parameter to M106 takes a value from 0 (off) to 255 (full on). For quarter fan try S63 etc. The fans I’ve tested don’t always start with a very low value but will often work if turned full on first and then turned down to that low value.

Information and identification

  • Button text:ID
  • Command:M115
  • Button text:Endstop status
  • Command:M119
  • Button text:EEPROM info
  • Command:M503

For this one to work you must have turned on EEPROM in firmware https://github.com/kliment/Sprinter/blob/master/Sprinter/Configuration.h#L66


Posted in Uncategorized | Tagged , , , , , | 8 Comments

Steel U-frame Adapto

I finally finished my steel U-frame Adapto. This is a video of it printing it’s second calibration cube. I plan to blog more info on it so I hope you enjoy.
Dropbox + WordPress doesn’t seem to work, use this link:
https://www.dropbox.com/s/jml8jdj6pjdh5ol/Steel%20U%20frame%20Adapto%20video%20second%20calibration%20cube%20001.AVI

Adapto is a easy to build, _|_ frame 3D printer designed by RoTorIT. See RepRap Wiki: http://reprap.org/wiki/Adapto and GitHub: https://github.com/rotorit/Adapto .

Posted in Uncategorized | Tagged , , , , | Leave a comment

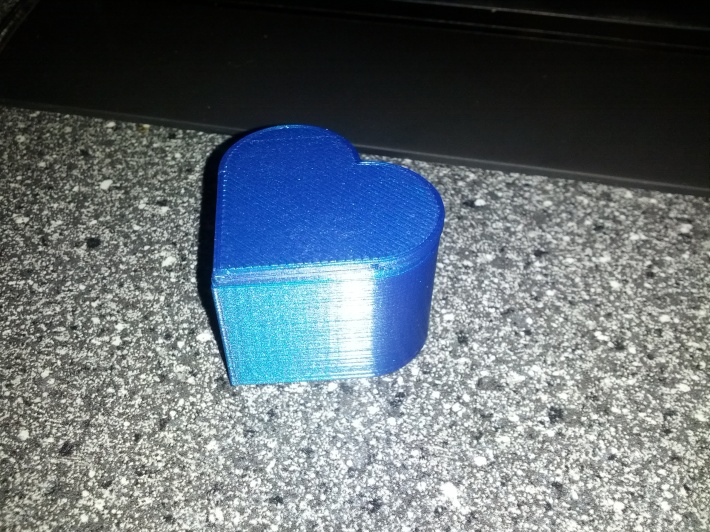
Heart shaped box

I finally got around to uploading the heart shaped box i designed. A bit late for Valentines but maybe someone will find it useful?

http://fizzybles.com/dir/node/34


Thanks to blddk for printing an awsome demo and for the picture.Image

Posted in Uncategorized | Tagged , , | 1 Comment

My favourite Reprap Prusa Mendel upgrade

The upgrade I like best for my reprap prusa mendel (i2) is RoTorIT’s Z endstop adjuster. It is an easy print that just clips on and makes adjusting the print height over the bed for that all-important first layer adhesion so much easier.

You can find it at http://www.thingiverse.com/thing:15269

Posted in Uncategorized | 1 Comment

Finding wire pairs for stepper motors

Before you read this remember: NEVER connect or disconnect a motor with the power on.

The NEMA 17 stepper motors typically used for repraps nowadays have four wires in two pairs and are connected to electronics like RAMPS with a four pin female plug. The cheapest motors usually don’t have long wires or a plug connected so someone building a reprap needs to identify the two pairs of wires.

I have heard stories of motors from the same manufacturer and even the same order having different colour coded wires so I do not recommend relying on schematics and wire colour coding. Luckily there is an easy way to find the pairs:

With all wires loose and unconnected twirl the motor shaft with your finger and thumb. If the shaft is hard to grasp put a pulley on it first. There should be little resistance, the shaft should move quite smoothly. Then take two of the wires and hold them together to short them. Twirl the motor shaft. If you can feel noticable resistance and stepping on the shaft you have found a pair. If not keep one of the wires and try shorting it with one of the two others until you find a pair.

If you number the pins on your plug 1,2,3,4 then one pair must be wired to 1 and 2, the other to 3 and 4. I use solder, heat shrink and electrical tape to connect the wires. I wish there was an even simpler method that is reliable. Remember, reprap wiring is typically subjected to (some) heat and potentially a lot of vibration and mechanical wear and tear.

If your motor goes backwards there is an easy solution: disconnect power and reverse the four pin motor plug. This reverses the direction of both pairs and the motor, three reversals has the net effect of reversing the motor so it turns the right way.

Just remember: NEVER connect or disconnect a motor with the power on.

Posted in Uncategorized | Tagged , , , , | Leave a comment

https://dl.dropbox.com/u/96201881/Reprap%20hardware%2C%20software%20and%20data%20architecture.odp

https://dl.dropbox.com/u/96201881/Reprap%20hardware%2C%20software%20and%20data%20architecture.odp

The libreoffice source to yesterdays pic.

Posted in Uncategorized | Leave a comment

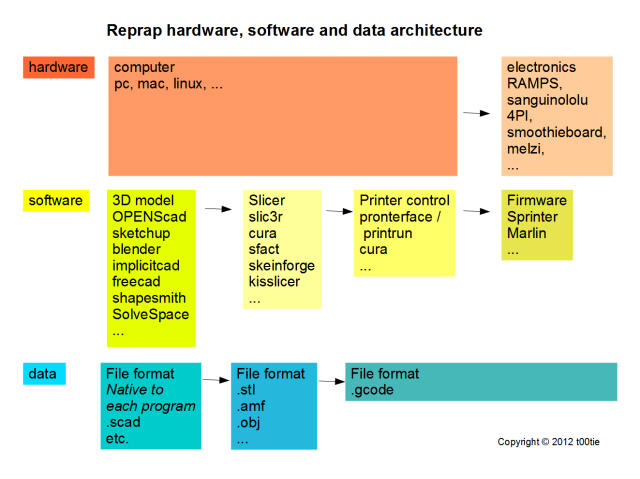
Reprap hardware, software and data architecture

I missed a decent overview so I created one. Image and source available.

Reprap hardware, software and data architecture

An overview of typical reprap data flow.

Now if only wordpress would let me upload the source which is .odp

Posted in Uncategorized | Leave a comment